


")
Cookies help us deliver our services. By using our services, you agree to our use of cookies.
Search
You have no items in your shopping cart.
Range Guide
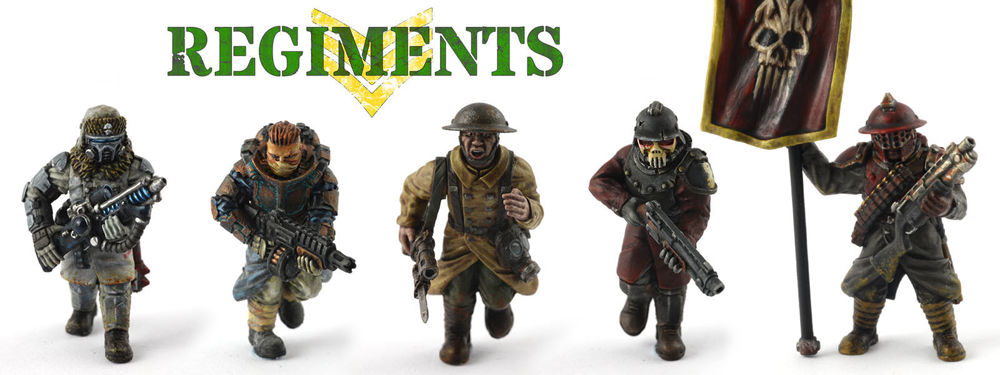
Regiments is a huge range of the best alternative 28mm heroic scale infantry components and kits from Anvil Industry.
Custom Miniatures and conversion parts for use any almost any Wargaming setting - Sci-Fi, Fantasy, Medieval, Napoleonic, Alternative World War, Post-Apocalyptic, Jungle, Trench and more!
Our customers have used Regiments miniatures in established wargames like Warhammer 40,000™, Necromunda™ and Deadzone™, as well as smaller independent games including
INQ28, Realities Edge™, Frostgrave™, mordheim™, Spectre Operations™, Zona Alfa™ This Is Not A Test™ and more! (Games mentioned here are the property of their respective owners and are given as examples of possible use based on customer feedback. Regiments miniatures are not endorsed by or associated with any other wargame publishers.)
Build a squad with any combination of parts - Male and Female Miniature options, Command Squads, Infantry Squads, Specialist Weapon Squads, Heavy Weapon Squads and more are available!
Extensive Range
Over 400 different conversion bits and kits available, with regular new additions!
Heroic Scale
Compatible with the widest range of existing products and popular plastic infantry kits.
Regiments models are approximately the same heroic scale/proportions as Games Workshop Cadian Astra Militarum Imperial Guard Miniatures.
User-Friendly
Where possible components feature a peg assembly system for precise and easy dry fitting and assembly.
High Quality
We've used the latest digital design methods and highest quality resin casting to achieve incredible levels of detail and quality.
Maximum Variety
Most Leg and Arm sets offer 10 poses for each style, and head sprues include many unique variants, so no two figures in your army need to look the same!
Purchasing Regiments Products
Regiments products are designed to offer the best possible mix of flexibility and value:
Individual Sprues are available, organised in categories by product type.
Regiments Custom Squad Builder allows you total freedom to design your original Regiment, picking from any available parts in the range, and adding optional extras to build your ideal combat force! There are over one million unique combinations of parts available.
Scale Guide
Differences among manufacturers and descriptions can cause a lot of confusion about scale. Regiments miniatures are designed in what is commonly called "28mm heroic". They are approx 30.5mm tall and have larger heads, guns, and limbs than more "realistic" miniatures, which makes them sturdier, easier to build and paint, and look more eye-catching from a distance.
Here is a scale comparison photo comparing some Regiments figures to some popular plastic figures (Cadian Astra Militarum Imperial Guard and Space Marine) from Games Workshop which many gamers will be familiar with.
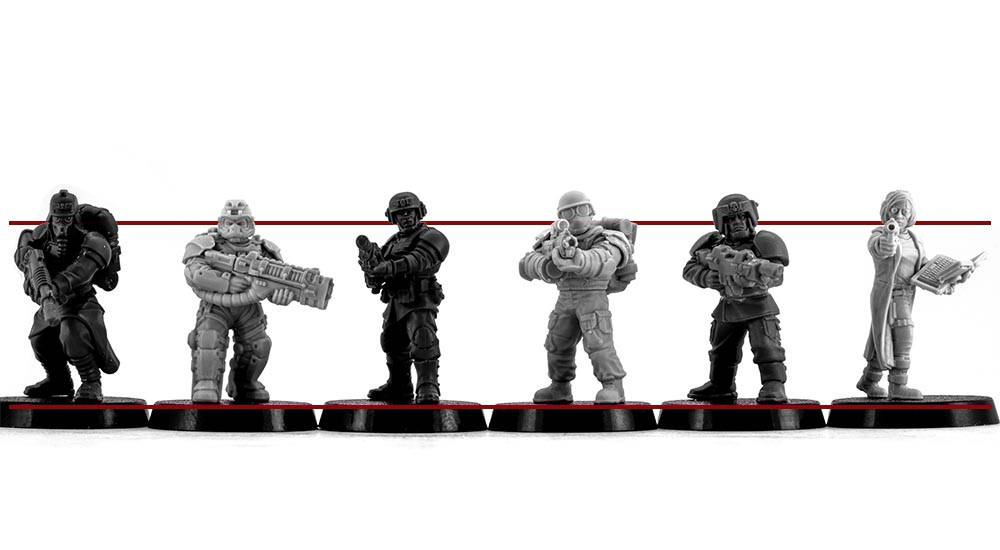
Above Left to right : Veteran Guardsman © Games Workshop Ltd, Male Regiments Figure, 2022 Cadian Guardsman © Games Workshop Ltd, Male Regiments Figure, Cadian Guardsman © Games Workshop Ltd, Female Regiments Figure
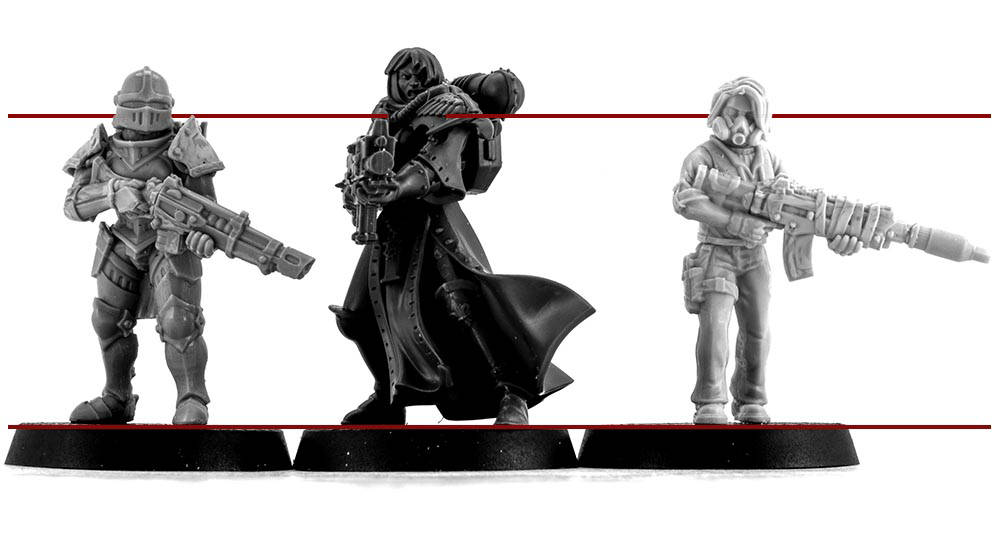
Above Left to right : Daughter of the Burning Rose, Battle Sister © Games Workshop Ltd, Female Regiments Figure
Cadian Astra Militarum Imperial Guard, Veteran Guardsman, Battle Sister and Space Marine miniatures are Copyright Games Workshop PLC. Images are used here for scale comparison, which we believe constitutes fair use.
Assembly Guide - We STRONGLY recommend reading this entire guide before building Regiments miniatures.
You can also read our more general "Working with Resin" guide which you can find at the bottom of the page.
1. Preparation.
Your parts should be virtually 100% free of defects and bubbles, and have only minimal mould lines, so clean up is usually straightforward. It's easiest to remove the parts from the sprues carefully with clippers. Arms are supplied as pairs, and should be kept on their "letter" tab until they are about to be glued on a model!
Resin is reasonably easy to work with, but if you choose to use sandpaper or a file this can create hazardous dust. Work in a well-ventilated area and use water on your tools to minimise dust in the air.
Resin parts can occasionally have a shiny surface from the casting process which can interfere with paint sticking, so it's best to give the parts a gentle scrub with warm water, detergent and a toothbrush, take extra care with thin or smaller parts.
2. Assembly Notes
DRY FITTING - We strongly recommend that at ALL stages of assembly, you test fit the parts without glue first before adding glue and making the connection permanent.
Resin parts need to be glued to other resin parts with Super Glue, please take care to avoid glueing the resin parts to your fingers, tools, desk etc.
Legs are supplied with textured tabs that fit exactly into the supplied slotta bases, and should sit flush and almost disappear when painted, but you may wish to add sand, filler or use alternative bases. The Peg on the waist joint fits Regiments torsos but can be clipped off and smoothed if you want to use the legs with other torsos.
Torsos fit on the waist peg and can be freely rotated to various angles.
Arms are the most difficult part of the assembly process. After deciding which arms to use with a particular torso, follow these steps to ensure the best result -
- Check the back of the weapon is smooth where it joins the stock, and fits cleanly into the slot in the pistol grip hand. If it doesn't fit easily, you may need to remove some material from the peg.
- After checking the fit, glue the weapon into the pistol grip hand (usually the right arm), ensuring it is correctly lined up with the stock (look from the front and the top.
- IMPORTANT - Check the fit of the arm and weapon against the torso - Certain combinations of arm and torso result in a not quite perfect fit - in these cases, you will need to remove material from the torso (where it is covered by the arm/stock/weapon) until the arm fits flush with the side of the torso.
- Before further glueing, "dry fit" the right and left arms in place on the torso, ensuring that the gun fits in the open hand (where applicable) and the open hand arm is also flush with the torso.
- After making any further adjustments to the torso/arms, glue first the pistol grip arm and then the open hand arm to the torso.
Shoulder pads are supplied on a sprue which uses one-piece casting - this means there are guaranteed to be no mould line at all on the pad itself. They are attached to their "tree" with a wide but very thin section of resin. It's best to clip the tree into pairs, then when you are ready to attach a pair of pads, carefully clip the thin resin gate away from both ends and then file or sand the inner surface of the pad flat, leaving a flawless part
Depending on the arm and pose, you may find the pads do not sit quite right, and you need to remove some material from the top of the arm (where it will be hidden under the pad) before glueing it on. The best way to connect a shoulder pad is with a small blob of milliput, which acts as both gap filler and glue in one.
Heads should fit nicely into the torso ball joint if you ensure the bottom of the neck has had the resin 'gate' removed fully. A range of head poses are possible as standard, but you can shave small amounts of resin from the neck area or side of the chin to allow some more angled poses.
Equipment, such as mags, pouches, and weapon accessories can be attached.
Gap Filling - Modular Kits, even with the most careful assembly, will occasionally have small gaps where parts are joined together. They will often disappear on painting, but if you have the time and want the best results, you can use green stuff, milliput or a similar filler to fill small gaps.
3. Undercoating
Once your miniatures are ready for painting, we recommend either undercoating with a quality undercoat spray, you can also undercoat using an airbrush if you have made sure the resin is clean. we recommend you don't undercoat resin miniatures by hand, though it is possible.
4. Paint your miniatures, and send us some photos so we can admire your work!
")
")
")
")
")